I got these circumstances where puppet mucked with uid/gid of files and directories. Consequently, the clusterware on one node won’t come up anymore. 2 weeks interacting with Oracle Support to no avail. Unbelievable… Ultimately they suggested to remove the nodes from the cluster and add them back. That is exhaustive enough that I may as well re-install the stack from scratch. This step-by-step guide captures the experience of re-installing the entire ODA Release 18.3 stack myself remotely through the ILOM.

Why Do This?
For the initial deployment, Oracle will come to your data center, physically put together everything, and install the entire stack. It is a turn-key solution. But you may run into situation like mine that requires you to redo the installation yourself. Once you get this into a repeatable process, then you can keep testing until you’re happy with the results.
Specs
Let’s first cover some specs.
Baremetal/Virtualized: Baremetal
Hardware: ODA X7-2HA
Storage: Single shelf
Clusterware version: 18.0.0.0 (fixed with the 18.3 stack)
Database version: 12.1.0.2 (12.1.0.2, 12.2.0.1, 18.0.0.0 available)
Download Software
Download all the needed software and get it all onto the ODA hosts in a directory structure.
| Step | Screenshot/notes |
|---|---|
| Download Server patch | 28864490 |
| Download Clusterware patch | 27604593 |
| Download Database patch | 23494992 |
| Put the patch files on the servers | scp these files to each host under /opt and organize them into this structure: /opt/patches/server /opt/patches/gi /opt/patches/db |
| Unzip the zip files and delete the zip files to save space. |
This is the page showing all the software in case you want to see other available downloads: link
Reimaging
Next we will re-image the systems, giving them the base software stack for the server and storage components.
| Step | Screenshot/notes |
|---|---|
| Download the zipped disk images | link |
| Extract zip on your local drive | |
| Browse to BOTH ILOMs and log in as root. The password should be welcome1. |  |
| Launch Remote Console |  |
| Mount the iso on your local disk remotely onto your console. | On each console: KVMS / Storage Click Add, to add an iso image locally stored on your workstation. Uncheck SSL Enabled Connect OK  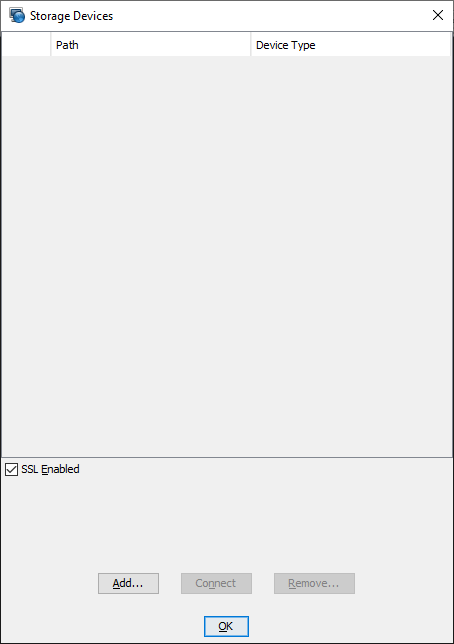 |
| Specify the boot device. | For each web console, specify a CDROM booting device. This will only take effect once on the next reboot. Host Management (left) / Host Control Next boot device: CDROM Save Power control Power cycle Save Ok (This will reboot the host.) 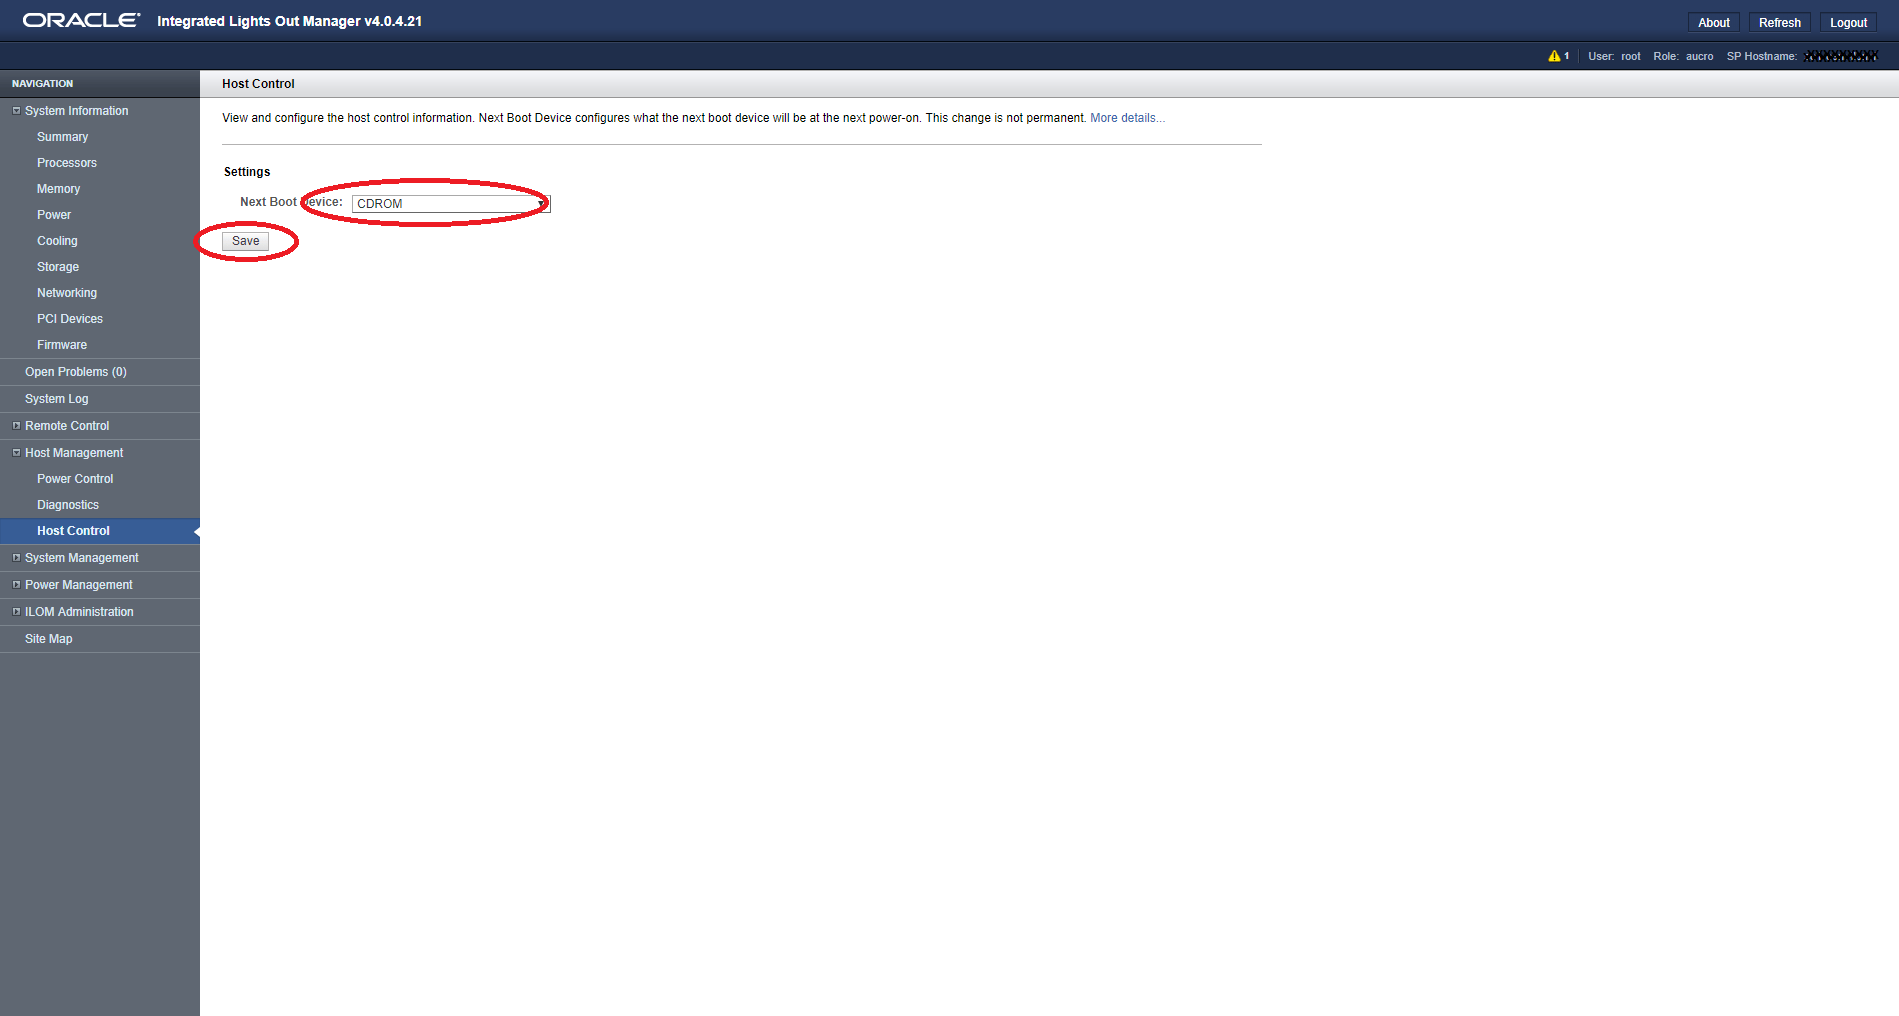 |
| Upon reboot, the hosts will reimage by themselves. | |
Patching
On the patching step, we’ll update the repository about the server patches(server + storage), clusterware patches, and database patches.
| Step | Screenshot/notes |
|---|---|
| ssh to both hosts | root/welcome1 |
| Configure network | Run the following as root: configure-firstnet |
| Sanity checks | /opt/oracle/dcs/bin/odacli validate-storagetopology ethtool p1p1 ethtool p1p2 |
| Server | |
| Update repository | Update repo only from the first node only. Do not put spaces near the commas in the -f list. /opt/oracle/dcs/bin/odacli update-repository -f /opt/patches/server/oda-sm-18.3.0.0.0-181205-server1of3.zip, /opt/patches/server/oda-sm-18.3.0.0.0-181205-server2of3.zip, /opt/patches/server/oda-sm-18.3.0.0.0-181205-server3of3.zip /opt/oracle/dcs/bin/odacli describe-job -i {job id from above} |
| Update Server | Fire the update on the first host. This command does it for both hosts. The –node or -n parameter can be used if you want to do it per server. /opt/oracle/dcs/bin/odacli update-server -v 18.3.0.0.0 /opt/oracle/dcs/bin/odacli describe-job -i {job id from above} |
| Sanity check | A casual check on the status of the stack: /opt/oracle/dcs/bin/odacli describe-latestpatch |
| Storage | |
| Update Storage | The storage patches are included in the zip files at step 6. So you just need to fire the update for the storage. If you're updating an ODA in production where a critical service is running, you would want to use the -rolling parameter. /opt/oracle/dcs/bin/odacli update-storage -v 18.3.0.0.0 -rolling |
| Clusterware/DB | |
| Update Repository | For the clusterware and database software, you just need to update the repository because it is the Create Appliance step later that would install it and create the database. /opt/oracle/dcs/bin/odacli update-repository -f /opt/patches/gi/odacli-dcs-18.3.0.0.0-181205-GI-18.3.0.0.zip,/opt/patches/db/odacli-dcs-18.3.0.0.0-180905-DB-12.1.0.2.zip |
Creating the Appliance
Make sure both port 7070 and 7093 are opened between your workstation and the ODA, so that you can actually reach the web console through a browser.
| Step | Screenshot/notes |
|---|---|
| Cleanup | If you're redoing this Create Appliance step, run the following as root: /opt/oracle/oak/onecmd/cleanup.pl |
| Reconfigure network | Run the following as root: configure-firstnet |
| Configure DNS | vi /etc/resolv.conf and put in the appropriate DNS configuration entries. |
| Launch Web Console | https://{IP}:7093/mgmt/index.html where IP is the public IP address of the first host. |
| Change password for oda-admin | |
| Log back in to the Web Console | https://{IP}:7093/mgmt/index.html where IP is the public IP address of the first host. |
| Create Appliance | Click on Create Appliance and enter all the necessary info.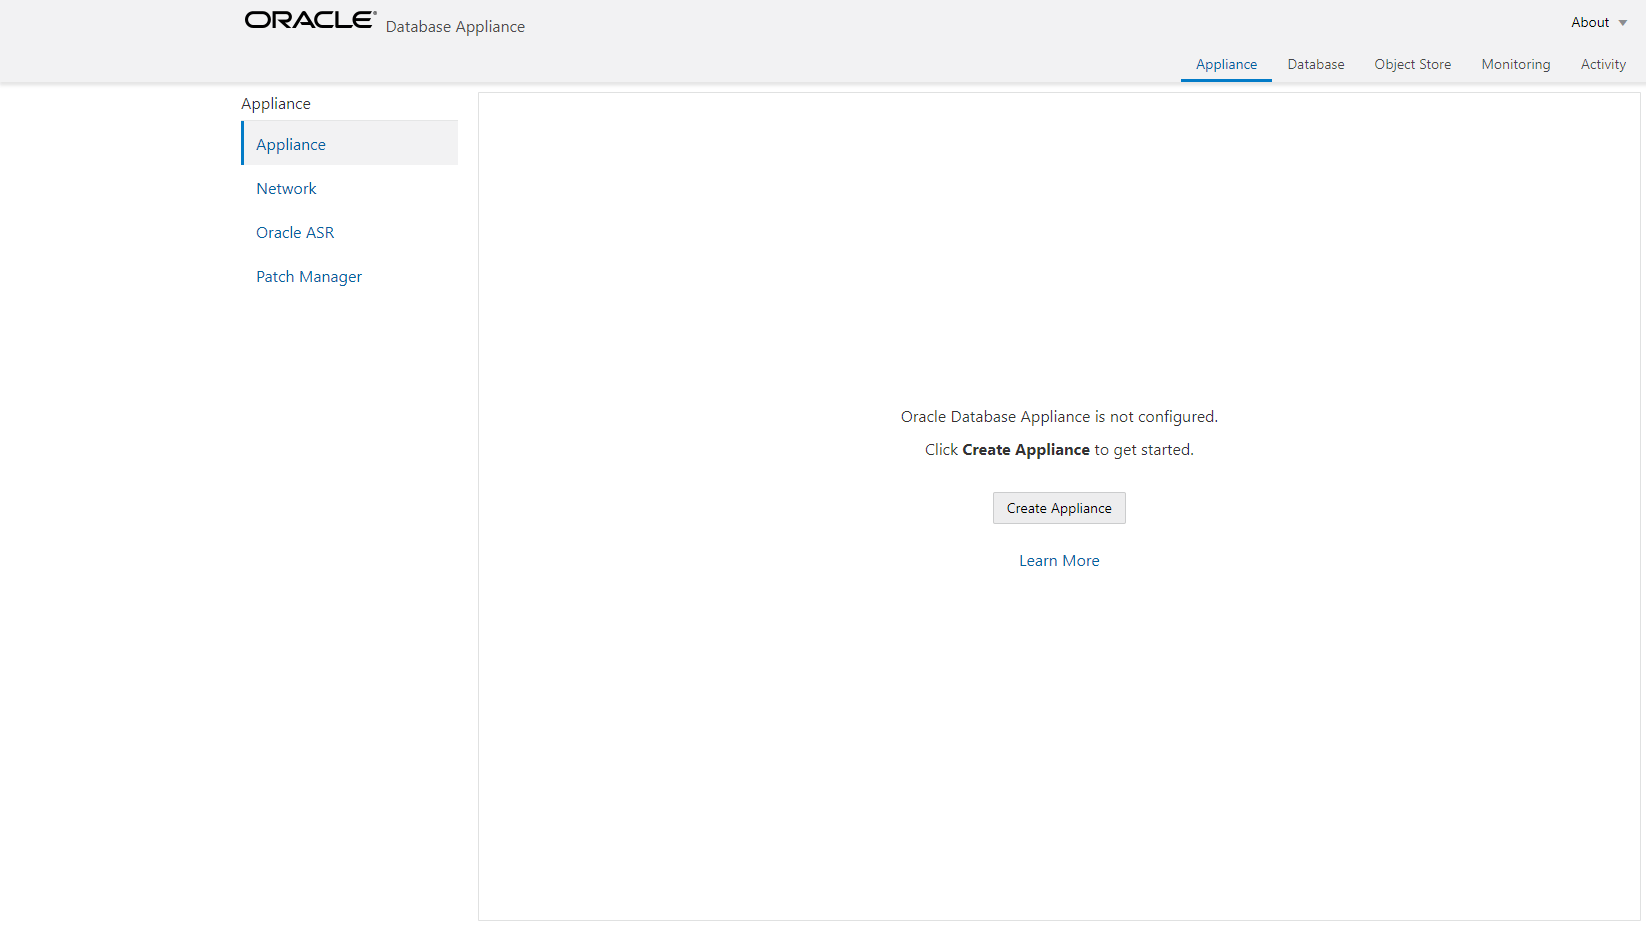 Some notes: System Information Domain name: Do not enter a dot in the front, like ".bwong64.com". That would get you in so much trouble. Data Storage Percentage: Be careful about this setting. Once the appliance is created, it would be very hard to change. User and Group Selection If you use puppet and it has specific UIDs and GIDs, so that puppet won't flip change values later on. ASR Information Select INTERNAL for ASR Type, since the ODA has its own ASR manager service. |
Issues
1) After completing all the steps above and I rebooted the hosts, the Oracle instances had problem starting up. The alert logs were showing the following entries, indicating there’s a problem with memory configuration.
Tue May 14 00:06:17 2019 Dump of system resources acquired for SHARED GLOBAL AREA (SGA) Tue May 14 00:06:17 2019 Per process system memlock (soft) limit = 64K Tue May 14 00:06:17 2019 Expected per process system memlock (soft) limit to lock SHARED GLOBAL AREA (SGA) into memory: 96G Tue May 14 00:06:17 2019 Available system pagesizes: 4K, 2048K Tue May 14 00:06:17 2019 Supported system pagesize(s): Tue May 14 00:06:17 2019 PAGESIZE AVAILABLE_PAGES EXPECTED_PAGES ALLOCATED_PAGES ERROR(s) Tue May 14 00:06:17 2019 2048K 101430 49154 0 ORA-27125 Tue May 14 00:06:17 2019 Reason for not supporting certain system pagesizes: Tue May 14 00:06:17 2019 4K - Large pagesizes only Tue May 14 00:06:17 2019 RECOMMENDATION: Tue May 14 00:06:17 2019 Increase per process memlock (soft) limit to at least 96GB to lock 100% of SHARED GLOBAL AREA (SGA) pages into physical memory Tue May 14 00:06:17 2019
The solution is to edit /etc/security/limits.conf and change the following entries to be at least the size of the SGA:
soft memlock {size in KB}
Last Words
Thanks for staying thus far. If you find this useful, please make a comment and subscribe to my email list. Much appreciated!